Well, as usual, I have been so busy doing projects, and preparing for new things that I haven't taken time to post new items. But I thought that I would take time from a busy schedule this evening to show you one of my favorites.
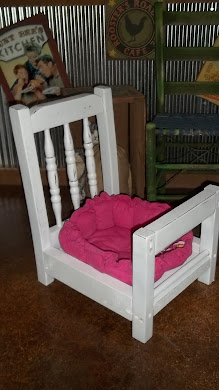
This is a doggie bed made from a dining chair that I picked up at the goodwill for $5.00. I actually picked up 3 of them. As you can see, Cut the front legs off, and turn them upside down.
I ordered the cushions on ebay for the inlay. Now, it is ready to paint. I will post finished product tomorrow.
Backwoods in Arkansas. Pictures and Recipes from the hills of Arkansas.
Thursday, January 31, 2013
Sunday, January 27, 2013
Guess what!! It is finished, folks!!! Yes, I am excited. Now, if you are going to make one of these, I recommend a large work area, and about 3 days that has nothing else involved. But in the long run, it was SO well worth it I must say.

Stripping old windows is the hardest.
I found out using old windows, so you won't kill your birds, use water base paint. Exterior, glossy sheen. Plus gloss is easier to clean up after them.
I have a daughter who is 18, that is like having a 5 year old around. She didn't hardly let the paint dry, and she wanted birds. So, we went to PetsMart. We now own Lennie and Squikie.
Antique windows can sometimes come in such large sizes, and mine are..so we cut them down, and made 21"x16"x32". As you can see the 16 is the depth. You can do this to your own specification for your area. The tray inside that pulls out, is from a kitchen store. Paid 11.00. Good luck.
Thursday, January 24, 2013
Well, this bird cage out of antique windows takes a little longer than what I expected. But we now have it all framed in, tray in it, and ready for painting. Then we will be cutting wire for placement. I have already cut my cedar branch, and have it drying outside, that will be placed inside for the birds to perch on. More to come soon.
Wednesday, January 23, 2013
I haven't been able to get on here and post because I had medical issues going on. But I went for a procedure yesterday, got a clean bill of health, and now I am hittin' the floor running!!
I have decided to do a show in May that I have never done, and I am really excited about it! So. many great things to come on my blog! Thanks to the Great Lord above, I can keep goin'. Y'all have a great day!! Today, I am working on a bird cage out of antique windows. Stay tuned!!!
Saturday, January 19, 2013
Tuesday, January 15, 2013
Well, I had such a busy day yesterday, that I did not even feel like posting last night. I was too pooped! I took a shower, and sat and watched my NCIS dvd's. But I have got to show you today what I accomplished yesterday! Yes, my back hurts, but it was well worth it.
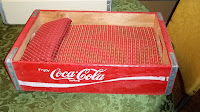
First, I started the day making doggie beds from cola crates because I have so many crates that they are covering a whole wall in my storage room.
Then I went to my craft room and completed an apron that I started 2 or 3 weeks ago, and never finished. I love the colors on this one.

I ended my night at 8pm with the best piece of all. This is a english tea buffet that I picked up from an antique dealer last year that was going out of business. Someone had put 50 coats of paint on her. So it was easier to just do it in chalk paint and be done with it. (6 hours later). But it was a good day.
Monday, January 14, 2013
I finished doors not about a month ago for a lady that wanted them for her daughter for a vintage wedding. Now I need some for my booths in the store. Guess I will be working on this today. Since it's 20 degree outdoor, guess I will be doing it watching Andy Griffith. Thank the Lord again for Stained Concrete floors that are easy to clean if you splash.
Saturday, January 12, 2013
Thursday, January 10, 2013
I actually thought of this little project all by myself. No blogs or pinterest to help. Very inexpensive. I like that part!!
 Spray your sides of the candle holder and start stretching your doylie TIGHT toward the top. Work your way all the way around the jar.
Take a small doylie. Hold it up to your jar ahead of time to make sure that it will work.
A dollar store candle holder works best for this decor.
I bought this spray adhesive at wal-mart very cheap. I want to say it was under $5.00.
Spray the bottom of your candle holder, and place directly in the center of the doylie.
 Spray your sides of the candle holder and start stretching your doylie TIGHT toward the top. Work your way all the way around the jar.
Place your favorite bow, and you have a beautiful center piece!
Well, it has been FOREVER since I have been able to put anything on my blog. So I thought that I would take the time to give her an update. I haven't been able to do to many projects considering the holidays and now our normal Arkansas weather. But I have churned out a few.
Here is one more piece with antique doors (one of my favorite things). This is a shelving unit that can be utilized so many great ways. You can use it as a book shelf, mine is in the bathroom for towels, or use in the dining room for your unique antique pieces.
First of all, there is a full door in the back. Then, for the sides, this is another antique door that has been cut in half. Place your halves to your inside of your unit so that you don't see where you have made your cuts.
SHELVES ARE TRICKY!! I made 1"ledger all the way around sides and back to go along where I wanted my shelf. Use a level to make sure that you have it level and where you want it. Mark it, and I used screws.
After doing this exercise, measure inside dimensions for your shelves. *Note: Measure each shelf! I routered my edges for a finished look. Stained and polyed them. Pained the doors, then screwed shelves down.
TA-DA!! Another great
project completed!!!
Subscribe to:
Comments (Atom)
Doggie Bed

Doggie Bed From Chair

New Items
Swag Light of whiskey rings

New Projects
antique chair

denim decor w/ speriment splash
antique table w/ pennies

Gotta love chalk paint
Antique Door Bench

primitive Bench

Stenciled sign

New item for show
Burlap Napkin Rings

Harvest Decor
Antique Window

Another Window Project
Vintage cabinet

Cabinet made of screen door


